Voice
Connect with the app and join a channel. Speak. Your speaking indicator should light up.
The fastest path to a working server is the official Docker image. It bundles the Fancy Mumble server plus all of the extras (persistent chat, file server, screen-share relay, push notifications) into one ready-to-run package.
You will need:
The setup wizard walks you through every option and writes a ready-to-use
.env and mumble-server.ini for you. See Setup wizard
to get started - it produces the same result as the manual steps below but
explains each choice along the way.
The quickest manual option. The server derives its configuration from
MUMBLE_CONFIG_* environment variables at startup, including all
Fancy Mumble features. Use Option C instead if you prefer a
version-tracked config file.
Create a new folder and put a docker-compose.yml inside it:
services:  mumble-server:    image: ghcr.io/fancy-mumble/mumble-server:latest    container_name: mumble-server    hostname: mumble-server    restart: on-failure    ports:      - "64738:64738/tcp"   # voice and control      - "64738:64738/udp"      - "64739:64739/tcp"   # file server (emotes, attachments)      - "10000:10000/udp"   # screen-share relay    volumes:      - mumble-data:/data    environment:      MUMBLE_SUPERUSER_PASSWORD: "changeme"      MUMBLE_CONFIG_WELCOMETEXT: "Welcome to our server."      MUMBLE_CONFIG_USERS: 100      MUMBLE_CONFIG_REGISTERNAME: "My Fancy Server"
volumes:  mumble-data:
Start the server:
docker compose up -dCheck the logs to confirm it booted:
docker compose logs -f mumble-serverYou should see lines like Server listening on :::64738. Press
Ctrl+C to exit the log tail (the container keeps running).
Note the SuperUser password you set. If you left it as changeme, change it now:
docker exec mumble-server mumble-server \ --ini /data/mumble_server_config.ini \ --set-su-pw "your-strong-password"Open Fancy Mumble on your client machine and connect to
your-host:64738. See Connect to a server.
Use this when you want to enable Fancy Mumble features like persistent
chat, the file server, or the screen-share relay. A mumble-server.ini
is mounted directly into the container; all MUMBLE_CONFIG_* environment
variables are ignored once MUMBLE_CUSTOM_CONFIG_FILE is set.
Create a new folder and put these two files inside it:
services:  mumble-server:    image: ghcr.io/fancy-mumble/mumble-server:latest    container_name: mumble-server    hostname: mumble-server    restart: on-failure    ports:      - "64738:64738/tcp"   # voice and control      - "64738:64738/udp"      - "64739:64739/tcp"   # file server (emotes, attachments)      - "10000:10000/udp"   # screen-share relay    volumes:      - ./mumble-server.ini:/data/mumble-server.ini:ro      - mumble-data:/data    environment:      MUMBLE_SUPERUSER_PASSWORD: "changeme"      MUMBLE_CUSTOM_CONFIG_FILE: /data/mumble-server.ini
volumes: mumble-data:database=/data/mumble-server.sqliteport=64738users=100bandwidth=558000textmessagelength=500000imagemessagelength=1048576allowhtml=true
; Persistent chatpchatenabled=true
; File server (emotes, avatars, attachments)plugin.file-server.enabled=trueplugin.file-server.storagePath=/data/file-server-storageplugin.file-server.bindAddress=0.0.0.0plugin.file-server.port=64739; Set to true only when a reverse proxy (nginx, Caddy, Traefik, etc.) terminates TLS; in front of this port. Leave false (or remove) for direct HTTPS/plain connections.plugin.file-server.tlsTerminatedByProxy=true
; WebRTC SFU (screen-share relay); Change webrtcsfupublicip to your server's public IP before enabling.webrtcsfuenabled=falsewebrtcsfuport=10000webrtcsfupublicip=127.0.0.1
; Push notifications; Requires a Firebase project and credentials file. Leave disabled unless; you have completed the FCM setup (see Push notifications).pushenabled=falsepushcredentialspath=/data/fcm-credentials.jsonpushtopicprefix=mumble
[Ice]Ice.Warn.UnknownProperties=1Ice.MessageSizeMax=65536Edit mumble-server.ini to match your deployment. The file is
mounted read-only; restart the container after any change.
Start the server:
docker compose up -dCheck the logs to confirm it booted:
docker compose logs -f mumble-serverYou should see lines like Server listening on :::64738. Press
Ctrl+C to exit the log tail (the container keeps running).
Note the SuperUser password you set. If you left it as changeme, change it now:
docker exec mumble-server mumble-server \ --ini /data/mumble-server.ini \ --set-su-pw "your-strong-password"Open Fancy Mumble on your client machine and connect to
your-host:64738. See Connect to a server.
If you do not use compose:
docker run --detach \ --name mumble-server \ --publish 64738:64738/tcp \ --publish 64738:64738/udp \ --publish 64739:64739/tcp \ --publish 10000:10000/udp \ --volume mumble-data:/data \ --restart on-failure \ --env MUMBLE_SUPERUSER_PASSWORD=changeme \ ghcr.io/fancy-mumble/mumble-server:latestVoice
Connect with the app and join a channel. Speak. Your speaking indicator should light up.
Persistent chat
Send a message, disconnect, reconnect. The message should still be there.
File server
Try uploading your avatar from Settings, Profile. It should persist across reconnects.
Screen-share relay
Only applicable if you enabled the WebRTC SFU (off by default - see Screen sharing relay). Once enabled, start a screen share and a second person should see it without any extra setup.
The image you ran bundles a few pieces:
MUMBLE_CONFIG_* environment variables into a
config file at boot (Options B and D), or reads a mounted
mumble-server.ini directly (Option C).permission denied connecting to /var/run/docker.sock: your user
is not in the docker group. Run sudo usermod -aG docker $USER then
either log out and back in, or run newgrp docker to apply immediately.
On Windows, make sure Docker Desktop is running before invoking any
docker command.error getting credentials … exec format error: the Docker credential
helper configured in ~/.docker/config.json is a Windows binary that
cannot run inside WSL. The image is public, so no credentials are needed.
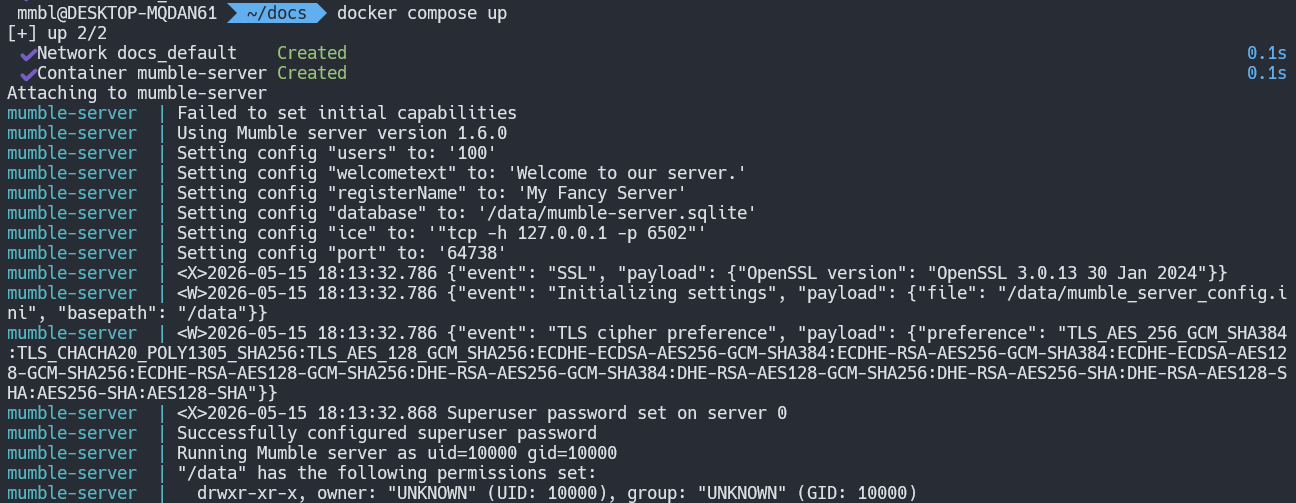
Reset the config with echo '{}' > ~/.docker/config.json and retry.Failed to set initial capabilities and friends in the logs: at first
startup the entrypoint runs the server binary briefly as root to set the
SuperUser password, which emits a cluster of warnings:
Failed to set initial capabilitiesWARNING: You are running murmurd as root, without setting a uname in the ini file.resource_limits {current: 0, max: 0}Failed to set priority limits.Failed to set final capabilitiesUnixMurmur::initialcap() / finalcap() which
expect Linux capabilities Docker drops by default. They are harmless
and only appear during the password-setting step. The actual long-running
server runs unprivileged as UID/GID 10000 via su-exec and does not emit
them. Do not set uname / MUMBLE_CONFIG_UNAME in a Docker
deployment - the named OS user does not exist in the image and the server
will exit with Cannot find username.64738/tcp
and 64738/udp on your router. The screen-share relay also needs
10000/udp to be reachable.MUMBLE_CONFIG_* value. The strict mode rejects
unknown keys.--set-su-pw command shown above, then restart.64738 is blocked. Voice
falls back to TCP, but viewers may need to force TCP too. Better:
open UDP.plugin on_load failed for fancy-file-server: this is
expected when using Option B (environment variables) without configuring
a file server storage path. The server continues to run normally; voice,
chat, and all other features are unaffected. To enable the file server,
switch to Option C and set plugin.file-server.storagePath in your
mumble-server.ini.Set up the SuperUser
See SuperUser & first login to take control of your fresh server.
Tweak the configuration
See Configuration reference for every available option.
Enable the feature deep-dives
Persistent chat, push, screen-share relay, file server, emotes, onboarding. All under Feature deep-dives in the sidebar.
Tear it back down
docker compose down -v removes the container and its data
volume. Without -v the data survives.